Welcome again! In my previous article I’ve talked about Windows Phone “Package.appxmanifest”. I’ve shown there, how to add custom application logos with different resolution. It makes your app much beautiful and attractive.
One more thing to add in your application is “Splash Screen”. This gives you a nice representation of your app and yourself or your company. So, how you can do that? It’s really simple to add a “Splash Screen” in Windows Phone 8.1 with Visual Studio 2013 update 3. Just go to “Package.appxmanifest” and open “Visual Assets” tab. Then you can find “Splash Screen” at the bottom.
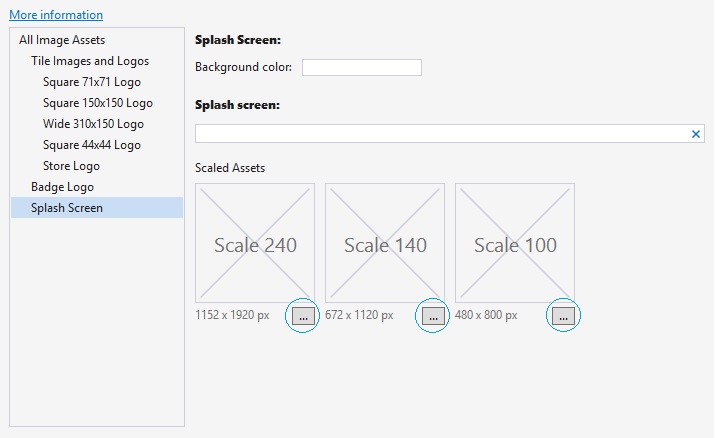
All you have to do, is just upload your “Splash Screen” in your project and locate this file. This will brings the “Splash Screen” when someone open the application, but it’ll vanish in blink of an eye. To make effective, we need to add “Splash Screen” in a different way. We call it “Extended Splash Screen”.
So let’s get crack in Windows Phone “Extended Splash Screen with Progress Bar”. First of all, take “Blank App” template, give it a name “ExtendedSplash.xaml” and customize your main grid like this.
<Grid>
	<Image x:Name="extendedSplashImage" Source="Images/SplashScreen.png" Stretch="Fill"/>
	<Canvas>
		<ProgressBar IsIndeterminate="True" Maximum="100" Value="30" Height="10" Width="400"/>
	</Canvas>
</Grid>
Here, we’ve also taken a “ProgressBar” control to indicate that the application is running while displaying the “Splash Screen”. It makes the application really cool.Now in “ExtendedSplash.xaml.cs” put this method below and call it from the constructor, like this.
public ExtendedSplash()
{
	this.InitializeComponent();

	//Call MainPage from ExtendedSplashScreen after some delay
	ExtendeSplashScreen();
}

async void ExtendeSplashScreen()
{
	await Task.Delay(TimeSpan.FromSeconds(3)); // set your desired delay
	Frame.Navigate(typeof(MainPage)); // call MainPage
}
Here we’ve ue an async method named “ExtendeSplashScreen” and make it delayed till three seconds. Then it’ll bring the “MainPage.xaml”.
One more thing to do, is make the start up page to “ExtendedSplash.xaml” otherwise the splach screen will not work. To do so, go to “App.xaml.cs” and find “OnLaunched” method, and at the bottom you’ll find “rootFrame.Navigate(typeof(MainPage), e.Arguments)”, change “MainPage” to “ExtendedSplash” which we’ve named to our “Splash Screen”.
if (!rootFrame.Navigate(typeof(ExtendedSplash), e.Arguments))
{
	throw new Exception("Failed to create initial page");
}
Now, we’ve set all things to make work our “Splash Screen”. But it’s really important to understand the Windows Phone page navigation service. We’ve set the starting page to our “Splash Screen” and after three seconds it’ll bring the “Main Page”. But when we want to go back, it’ll bring the “Splash Screen” again and after three seconds it’ll bring the “Main Page” again. So it’s just irritating. To avoid this problem we need to add a method called “HardwareButtons_BackPressed” in “MainPage.xaml.cs”
void HardwareButtons_BackPressed(object sender, Windows.Phone.UI.Input.BackPressedEventArgs e)
{
	Frame frame = Window.Current.Content as Frame;
	if (frame == null)
	{
		return;
	}

	if (frame.CanGoBack)
	{
		frame.GoBack();
		//Indicate the back button press is handled so the app does not exit
		e.Handled = true;
	}
}
Here, we make Frame object name “frame” and if it’s not null and if we’ve a go back state, then we make “e.Handled” equal to true, so that app doesn’t exit. If you make it false, the app will exit when you press the back button. Another problem is, if you have multiple of pages then it will bring the “Splash Screen” instead of bringing the previous page because of calling the method “GoBack”. We need this for another purpose which I’m talking later.
Now, we’re handling the “Can go back” task, but our problem still exists. To solve this problem we need to check the “Back State” situation. If the “Back State” equals to one, then we’ve only one page remaining and it’s obviously our “Splash Screen”. So, we just need to remove the “Back State” so that our app can exit. To do so, just put this code inside the “OnNavigatedTo” method.
// Check if ExtendedSplashscreen.xaml is on the backstack  and remove
if (Frame.BackStack.Count() == 1)
{
	Frame.BackStack.RemoveAt(Frame.BackStackDepth - 1);
}
Now, back to unfinished topic is why we need to use “frame.Goback” method, becauese if we don’t use it we’ll get an exception when we’ll navigate through multiple pages and press back key. To avoid that, we need this method. Now, run the application and it’ll work just fine.

If you look closely, you can see “Progress Bar” top of the “Splash Screen” and it’ll be displaying for three seconds, then the “MainPage” will come.
So, that’s it. Hope you’ve understand all these things. I’ll be here with a new topic soon. Till then good bye. Have a nice day. Happy coding.
You can download the full souce code from here,
Download link: http://1drv.ms/1FbBeBy
